Category: Tutorials

sewing machine tutorial brother

Brother sewing machines are ideal for beginners, offering user-friendly designs, essential features, and excellent support. They provide a perfect start for new sewers, combining durability and versatility for creative growth.

Why Brother Sewing Machines Are Ideal for Beginners

Brother sewing machines are perfect for beginners due to their ease of use and intuitive design. They offer clear guides for threading, basic stitches, and essential operations, making the learning process smooth. Built-in tutorials and user-friendly controls help new sewers master fundamental techniques quickly. Their durability and versatility ensure long-term creativity, from simple projects to advanced endeavors. Brother machines are robust, feature-rich, and supported by extensive resources, making them an excellent choice for anyone starting their sewing journey.

Essential Features of Brother Sewing Machines

Brother sewing machines are equipped with essential features that simplify sewing for beginners. They include built-in stitches, automatic threading, and easy-to-use controls. Many models offer clear LCD displays for selecting stitches and tensions. Brother machines also feature robust motors for smooth operation and durability. Additional features like free-arm designs and detachable tables enhance versatility for various projects. Built-in tutorials and guides help users understand basic functions. These machines also come with accessories like buttonhole feet and embroidery options. Their combination of functionality and user-friendly design makes Brother sewing machines a top choice for both learning and creative growth in sewing.

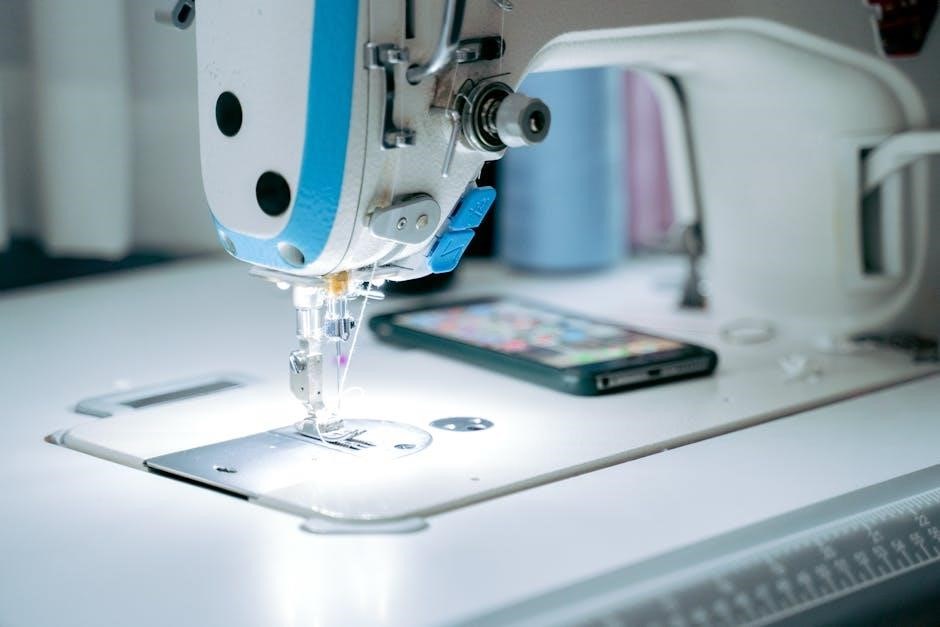
Setting Up Your Brother Sewing Machine

Setting up your Brother sewing machine is straightforward. Follow clear guides for threading, bobbin installation, and basic stitch settings. Designed for ease, it ensures smooth operation and versatility for various projects.

How to Thread the Brother Sewing Machine

Threading a Brother sewing machine is simple and straightforward. Start by placing the spool on the spool pin and guide the thread through the tension discs. Gently pull the thread to remove any slack, then insert it into the needle bar. Follow the machine’s marked path to ensure proper alignment. Once threaded, test by sewing a straight line to check for even stitches. Brother machines feature clear guides and numbered pathways, making the process intuitive for beginners. Always refer to the user manual or online tutorials for visual guidance to ensure accurate threading every time.

Winding and Installing the Bobbin

Winding and installing the bobbin is a crucial step for smooth sewing. Start by placing an empty bobbin on the winder and guide the thread through the bobbin tension guide. Hold the thread end and press the pedal to wind evenly. Once full, cut the thread, leaving a small tail. Insert the bobbin into the machine’s bobbin case, ensuring it rotates correctly. Pull the thread gently to seat it, then close the shuttle cover. Brother machines often have numbered guides or diagrams to help beginners align everything properly. Always test with a few stitches to ensure the bobbin is secure and tension is balanced.

Basic Sewing Operations

Master basic sewing operations with Brother machines. Start with straight stitching for even lines and backstitching for strong seams. Practice on scrap fabric to build skill easily.

Using the Straight Stitch for Beginners

The straight stitch is the simplest and most essential stitch for beginners. It’s perfect for sewing straight lines and is usually marked by a dotted line or labeled as stitch number one. To use it, select the straight stitch option on your Brother sewing machine, thread the machine, and gently guide the fabric under the presser foot. Start with scrap fabric to practice even stitching. This stitch is ideal for hemming, seaming, and repairing clothes. Once comfortable, you can move on to more complex stitches, but mastering the straight stitch is the foundation of all sewing skills. Practice makes perfect!

How to Sew in Reverse (Backstitch)

Sewing in reverse, or backstitching, is essential for securing seams at the beginning and end of your stitches. On Brother sewing machines, this feature is simple to use. Locate the reverse stitch lever or button, typically found on the front or side of the machine. Engage it to sew a few reverse stitches, then disengage to continue forward. This reinforces your seam, preventing it from unraveling. Use the foot pedal gently to maintain control. Always practice on scrap fabric first to ensure smooth, even stitches. Mastering the backstitch is a key skill for any sewer, providing professional-looking results for all projects.

Troubleshooting Common Issues

Troubleshooting common issues on Brother sewing machines involves addressing thread looping, tension problems, and jammed bobbins. Regular maintenance and proper threading can prevent these issues.

Fixing Thread Looping Under Fabric

Thread looping under fabric on Brother sewing machines is often due to improper threading or tension issues. To fix this, ensure the thread is correctly threaded through all guides and the tension is balanced. Check that the bobbin is properly seated and that the bobbin thread is pulled up before sewing. Adjust the top thread tension by turning the dials—tightening can reduce looping. Use the correct thread type and needle size for your fabric. Clean the machine to remove lint and ensure smooth operation. If issues persist, consult the user manual or a tutorial for specific guidance.

Adjusting Tension for Perfect Stitches

Brother sewing machines require proper tension adjustment to ensure perfect stitches. Start by threading the machine correctly and checking the bobbin. Turn the top tension dial to balance the thread flow—tightening reduces looping, while loosening prevents puckering. Test stitches on scrap fabric; if the top thread shows on the bottom, increase bottom tension. Use the built-in tension gauge for accuracy. Avoid over-tightening, as this can damage the machine. Refer to the user manual or Brother’s tutorials for specific models. Proper tension ensures even stitching and professional-looking results, making it a crucial step in every sewing project.

Maintenance and Accessories

Regular cleaning and lubrication keep Brother sewing machines in top shape. Explore accessories like specialized presser feet and extra bobbins to enhance your sewing experience.

Cleaning and Maintaining Your Brother Sewing Machine

Cleaning and Maintaining Your Brother Sewing Machine

Regular maintenance is key to extending the life of your Brother sewing machine. Start by turning it off and unplugging it for safety. Use a soft brush or cloth to remove dust and lint from the exterior and internal areas, especially around the bobbin case and needle area. Lubricate moving parts as recommended in the manual. Avoid using harsh chemicals, as they can damage the machine. For deeper cleaning, refer to Brother’s official tutorials or guides. Proper care ensures smooth operation and prevents common issues like thread looping or tension problems. Always follow factory guidelines for maintenance.

Exploring Brother Sewing Machine Accessories

Brother sewing machines offer a wide range of accessories to enhance your sewing experience. From various presser feet like the walking foot and buttonhole foot to embroidery hoops, these tools expand your creative possibilities. The Brother brand provides compatible accessories designed specifically for their machines, ensuring seamless performance. Additional items like extension tables, needle sets, and carrying cases are available to suit different projects. Explore Brother’s official website or authorized dealers to discover accessories that match your machine model and sewing needs, helping you achieve professional results with ease and precision.

Advanced Projects and Further Learning

Brother sewing machines support advanced projects with embroidery and quilting features. Tutorials and resources help users expand their skills beyond basics, exploring complex designs and techniques.

Exploring Embroidery and Quilting Features

Brother sewing machines offer advanced embroidery and quilting features, making them versatile for creative projects. Models like the Brother High-Speed Quilting and Sewing Machine and the Brother Innovis 1250 Embroidery Machine provide built-in embroidery designs and large working areas for quilting. These machines support intricate stitching, perfect for custom embroidery and quilting patterns. Tutorials and guides from Brother help users master these features, allowing them to create professional-looking designs. Whether crafting home decor or personalized gifts, Brother machines empower users to explore their creativity with precision and ease, making them ideal for both beginners and experienced crafters.

Where to Find Brother Sewing Tutorials and Resources

Brother provides extensive resources to help users master their sewing machines. The official Brother website offers video tutorials, step-by-step guides, and downloadable manuals. Additionally, the Brother Sewing Blog shares tips, tricks, and project ideas for all skill levels. YouTube channels like “Brother Sewing” and community forums are excellent for troubleshooting and learning advanced techniques. Many sewing enthusiasts also share their experiences and tutorials online, making it easy to find support. Whether you’re a beginner or an advanced sewer, Brother’s comprehensive resources ensure you can maximize your machine’s potential and enhance your sewing skills effectively.

vcarve pro tutorials

VCarve Pro tutorials are designed for all skill levels, offering step-by-step guidance from basic setups to advanced techniques. Whether you’re new to CNC machining or looking to refine your skills, these resources cover 2D and 3D toolpaths, design customization, and project setup to help you master the software.

With comprehensive video tutorials and detailed manuals, VCarve Pro empowers users to create intricate designs, from simple signs to complex 3D sculptures. Learn how to import files, organize projects, and troubleshoot common issues to unlock your full creative potential.

1.1. Getting Started: Absolute Beginner’s Guide

Welcome to the absolute beginner’s guide to VCarve Pro! This section is perfect for newcomers to CNC machining and design software. We’ll walk you through the basics of getting started with VCarve Pro, ensuring you feel comfortable navigating the interface and setting up your first project. Learn how to import files, such as SVGs, and understand the fundamental tools available. Discover how to create a simple sign by drawing shapes and adding text using the Draw Text Tool. Video tutorials are also available to guide you through these initial steps, making it easier to grasp the essentials. By the end of this guide, you’ll be ready to start your CNC machining journey with confidence. VCarve Pro’s intuitive design and extensive resources make it accessible for everyone, regardless of prior experience. Start here to build a strong foundation for more advanced projects in the future.

1.2. Overview of VCarve Pro’s Essential Tools and Features

VCarve Pro is packed with essential tools and features designed to streamline your CNC machining workflow. The software offers powerful 2D and 3D toolpath creation options, allowing you to design intricate projects with precision. Key features include the Draw Tools for creating and editing shapes, the Text Tool for adding custom lettering, and the Material Setup Wizard for defining your stock material. The software also includes a 3D preview and simulation tools, enabling you to visualize your design before machining. Additionally, VCarve Pro supports multiple file formats, making it easy to import and work with designs from other programs. The interface is user-friendly, with clear menus and icons that simplify navigation. Video tutorials are available to help you master these tools and features, ensuring you can unlock the full potential of VCarve Pro for your projects. These resources are tailored to help both beginners and advanced users make the most of the software’s capabilities.

Setting Up Your First Project in VCarve Pro

Setting up your first project in VCarve Pro involves creating a new job, setting up your material dimensions, and importing your design files. The software guides you through essential configurations to get started with CNC machining.

Once your project is set up, you can begin designing and preparing toolpaths for machining. The intuitive interface helps streamline the process, ensuring a smooth start for your CNC projects.

2.1. Basic Setup and Configuration

Starting with VCarve Pro begins with launching the software and creating a new job. Define your material dimensions, such as width, height, and thickness, to set up your workspace accurately. Configure essential settings like measurement units and machining options to align with your CNC machine’s requirements.

Next, familiarize yourself with the interface by organizing your tools and materials. Assign a safe Z-axis height for tool changes and set up your spindle or router specifications. These initial configurations ensure a smooth transition from design to machining.


Finally, review and save your setup to begin designing your project. This foundational step is crucial for accurate toolpath generation and successful machining. Tutorials and guides are available to help you master these initial configurations effortlessly.

2.2. Importing and Organizing Files

Importing files into VCarve Pro is straightforward, supporting various formats like SVG, DXF, and PDF. Once imported, organize your design elements using layers for better visibility and control. Each layer can be toggled on or off, making it easier to manage complex projects.

To center and resize your design, use the alignment tools or manually adjust dimensions. Grouping related elements ensures they move or scale together, maintaining your design’s integrity. Additionally, sheets allow you to organize parts across multiple pages, which is ideal for larger projects requiring tiling.

Finally, use the preview feature to visualize your design on the virtual material before machining. This step ensures accuracy and helps identify any layout issues early on. Proper file organization and setup are key to efficient CNC machining with VCarve Pro.

Mastering 2D Toolpaths

Mastering 2D toolpaths in VCarve Pro is essential for creating precise designs. Learn to use Profile, Pocket, and V-Carve toolpaths to achieve professional results. Tutorials guide you through setting up tabs, ramp plunges, and optimizing cuts for efficiency and safety.

With practice, you’ll confidently create intricate 2D designs, from simple engravings to complex shapes, ensuring accurate and high-quality CNC machining outcomes. These toolpaths are fundamental for any project, making them a cornerstone of VCarve Pro proficiency.

3.1. Creating Standard 2D Toolpaths

Mastering standard 2D toolpaths is fundamental for any VCarve Pro project. These toolpaths, such as Profile, Pocket, and V-Carve, allow you to create precise cuts for various designs. Tutorials guide you through setting up these toolpaths, including defining boundaries, selecting tools, and adjusting settings for optimal results.

Learn how to use the Profile toolpath for cutting out shapes, the Pocket toolpath for removing material within boundaries, and the V-Carve toolpath for creating decorative V-shaped cuts. Video tutorials demonstrate how to add tabs to secure material, use ramp plunges for safe tool entry, and optimize feeds and speeds for different materials.

By practicing these techniques, you’ll gain confidence in creating intricate 2D designs, from simple engravings to complex shapes. These foundational skills are essential for achieving professional-quality CNC machining results in VCarve Pro. Start with basic projects and gradually explore more complex designs as your proficiency grows.

Exploring 3D Toolpaths

Discover how to create complex 3D designs using VCarve Pro’s advanced toolpaths. Learn to model and sculpt 3D objects, generate precise toolpaths, and achieve professional-grade results for intricate projects.

Master techniques for 3D machining, from basic shapes to detailed sculptures, and explore the software’s capabilities for bringing your 3D visions to life with ease and precision.

4.1. Understanding 3D Modeling and Sculpting

Mastering 3D modeling and sculpting in VCarve Pro unlocks the ability to create intricate and detailed three-dimensional designs. The software provides powerful tools to import and manipulate 3D models, allowing users to craft complex shapes and patterns. Whether you’re working with pre-made 3D clipart or designing from scratch, VCarve Pro offers intuitive features to refine and customize your designs.

Learn how to set up your project for 3D machining, including defining materials and establishing a clear coordinate system. The VCarve Inlay Toolpath is a standout feature, enabling precise creation of inlaid designs by generating toolpaths for both male and female components. Tutorials guide you through optimizing your models for machining, ensuring smooth transitions and professional-grade finishes.

With step-by-step instructions, you’ll discover how to import 3D clipart, customize designs with text, and add fine details. Comprehensive video tutorials cover every aspect, from basic 3D modeling to advanced sculpting techniques, helping you achieve stunning results in your CNC projects.

Customizing Your Designs

Elevate your projects by adding text, logos, and intricate details using VCarve Pro’s advanced tools. Learn to refine designs with precision, ensuring every element aligns perfectly for professional-grade results in your CNC creations.

5.1. Adding Text, Logos, and Fine Details

Mastering the art of adding text, logos, and fine details in VCarve Pro is essential for creating professional and personalized designs. This section covers the tools and techniques needed to incorporate intricate elements seamlessly into your projects. Learn how to import and manipulate vector files for custom logos, use the text tool to add meaningful messages, and refine details with precision. Understand how to adjust font styles, spacing, and sizing to ensure compatibility with your CNC machining setup. Discover tips for optimizing fine details to prevent tool breakage and ensure smooth machining. With these skills, you can transform simple designs into stunning, unique pieces that stand out. Whether it’s a personalized sign or a intricate inlay, VCarve Pro’s tools empower you to achieve professional-grade results.

Advanced Features and Techniques

Unlock the full potential of VCarve Pro with its advanced features and techniques, designed to elevate your CNC machining projects to the next level. Explore complex toolpath strategies, such as the VCarve Inlay Toolpath, which enables precise creation of intricate inlaid designs. Learn how to optimize your projects with advanced nesting and sheet management tools, ensuring efficient material usage. Discover how to incorporate 3D modeling and sculpting techniques to create stunning, multi-dimensional designs. Master the art of fine detailing with node editing and advanced vector manipulation. These features allow for unparalleled control over your designs, enabling you to produce professional-grade results. With VCarve Pro, you can tackle even the most intricate projects with confidence. Dive into video tutorials and detailed manuals to explore these advanced techniques and take your CNC machining skills to new heights. Whether you’re crafting custom furniture or intricate decorative pieces, VCarve Pro’s advanced tools will help you achieve perfection.

retool tutorial

Retool is a powerful platform enabling rapid creation of internal tools through visual design and seamless database/API connectivity, ideal for teams seeking efficient solutions.

Key Features of Retool

Retool offers visual design, database/API connectivity, drag-and-drop functionality, and code customization, enabling developers to build internal tools quickly and efficiently, empowering both technical and non-technical users to create robust solutions.

Visual App Design

Retool’s visual app design feature empowers users to create internal tools through an intuitive, drag-and-drop interface. This functionality allows developers and non-technical users alike to build applications by visually arranging components, reducing the need for extensive coding. The platform provides pre-built templates and customizable elements, enabling rapid prototyping and deployment. With Retool, teams can design apps that interface seamlessly with databases and APIs, ensuring a smooth user experience. The visual design tools also support complex workflows, making it easier to automate tasks and create interactive dashboards. This feature is particularly beneficial for teams looking to streamline development and deliver solutions quickly without sacrificing functionality or aesthetics.

Database and API Connectivity

Retool excels in connecting to various databases and APIs, enabling seamless data integration. Users can link their tools to REST APIs and databases like MySQL, PostgreSQL, and MongoDB with minimal setup. The platform supports direct data querying, ensuring real-time interactions and dynamic updates. Retool’s connectors allow for efficient data fetching and manipulation, making it ideal for building admin panels and dashboards. This capability streamlines the development process, enabling teams to focus on creating functional tools without the complexity of extensive backend configurations. With Retool, integrating data sources is intuitive, accelerating the development cycle and enhancing overall productivity.

Drag-and-Drop Interface

Retool’s drag-and-drop interface simplifies app development, allowing users to create tools intuitively. By dragging components like tables, buttons, and charts, developers can assemble interfaces without coding. This feature accelerates prototyping, enabling teams to build functional prototypes quickly. The visual approach reduces the learning curve, making it accessible to both technical and non-technical users. With pre-built components, users can focus on functionality rather than design complexity. The drag-and-drop system streamlines workflows, fostering collaboration and rapid iteration. It empowers teams to deliver internal tools faster, aligning with Retool’s mission to simplify software development and enhance productivity across organizations.

Customization with Code

Retool allows extensive customization through code, enabling developers to extend its functionality beyond visual design. Users can write JavaScript for client-side logic, SQL for database queries, or even Python/Node.js for server-side operations. This flexibility empowers developers to create tailored solutions, integrating custom components or complex workflows. Retool’s API connectivity further enhances its adaptability, allowing seamless interaction with external systems. The platform supports both no-code and low-code approaches, making it accessible to diverse skill levels. By combining visual tools with coding capabilities, Retool bridges the gap between simplicity and sophistication, offering a robust framework for building customized internal tools efficiently.

Building a Metrics Dashboard Tutorial

Learn to create a metrics dashboard with Retool, helping sales teams track KPIs and gain insights. This guide walks through setup and visualization of key data points efficiently.

Preparing Your Data

Before building your metrics dashboard, ensure your data is clean, organized, and formatted correctly. Identify the key KPIs and metrics your sales team needs to track. Connect your data sources, such as databases or APIs, and verify accuracy. Transform raw data into a structured format suitable for visualization. Use Retool’s data transformation tools to clean and preprocess data. Ensure data consistency and handle any missing or duplicate entries. Document your data sources and workflows for transparency. Finally, test your data setup to confirm it’s ready for visualization in the next steps of your dashboard creation process.

Connecting to Your Database

Connecting your database to Retool is straightforward and efficient. Start by accessing Retool’s database section and selecting your database type, such as MySQL or PostgreSQL. Enter your database credentials, including the host, port, username, and password; For APIs, provide the endpoint URL and authentication details if required. Test the connection to ensure it works seamlessly. Retool supports various databases and APIs, making it versatile for different data sources. Once connected, you can query data directly within Retool’s interface, enabling you to build dashboards and tools efficiently. Secure your credentials and manage access permissions to maintain data security.

Designing the User Interface

Designing the user interface in Retool is intuitive and user-friendly. Start by dragging and dropping components like tables, charts, and forms to create a layout that suits your needs. Use the visual editor to arrange elements and customize their properties, such as colors, sizes, and spacing. Retool offers pre-built templates to accelerate the design process, ensuring consistency and professionalism. You can also add interactivity by connecting components to data sources or actions. The interface is fully customizable, allowing you to tailor the look and feel to match your brand or user preferences. This flexibility makes it easy to create dashboards that are both functional and visually appealing.

Adding Components and Charts

Adding components and charts in Retool enhances the functionality and visual appeal of your dashboard. Use the drag-and-drop interface to incorporate elements like tables, forms, and buttons. For data visualization, select from a variety of charts such as line graphs, bar charts, and pie charts. These components can be easily connected to your data sources, ensuring real-time updates. Customize the appearance of charts by adjusting colors, labels, and formatting to match your design preferences; Interactive features like filters and drill-down capabilities can be added to enable users to explore data in depth. This step transforms raw data into actionable insights, making your dashboard a powerful tool for decision-making.

Testing and Deploying the Dashboard

Testing and deploying your Retool dashboard is crucial for ensuring functionality and security. Start by verifying that all components, such as tables and charts, display data accurately. Check interactive features like filters to ensure they work as intended. Retool offers debugging tools to help identify and resolve issues. Once testing is complete, deployment can be done through various methods, including cloud hosting or private servers. Security features like user authentication can be implemented to protect your dashboard. After deployment, updates can be made seamlessly. Following best practices from the Retool community can enhance the efficiency and effectiveness of your dashboard.

Use Cases for Retool

Retool is a versatile platform for building internal tools. Common use cases include admin panels, executive dashboards, CRUD applications, and client portals, streamlining business operations.

Admin Panels

Admin panels are a common use case for Retool, enabling teams to manage data and users efficiently. Retool simplifies creating custom admin interfaces, connecting directly to databases like MySQL or PostgreSQL. With Retool, developers can build admin panels in minutes, automating workflows and providing real-time data access. Its visual interface and drag-and-drop components make it ideal for non-technical users. Companies like Amazon and Pinterest use Retool for admin tools, showcasing its versatility. By leveraging Retool’s code customization, teams can tailor admin panels to specific needs, ensuring seamless integration with existing systems and enhancing productivity across organizations.

Executive Dashboards

Executive dashboards in Retool are designed to provide real-time insights and key metrics for decision-makers. They enable organizations to visualize data from multiple sources seamlessly. With Retool, users can create custom dashboards tailored to executive needs, focusing on KPIs and business performance. The platform’s drag-and-drop interface and pre-built components simplify the process, while its ability to connect to databases and APIs ensures data accuracy. Retool’s visual design tools allow for intuitive layouts, making complex data accessible. Companies like Amazon and Pinterest leverage Retool for executive dashboards, highlighting its effectiveness in delivering actionable insights. This makes it a powerful tool for aligning business strategy with data-driven decisions.

CRUD Applications

Retool simplifies the development of CRUD (Create, Read, Update, Delete) applications, enabling teams to manage data efficiently. With its intuitive interface, users can quickly design forms, tables, and workflows to handle database operations. Retool’s drag-and-drop functionality and pre-built components streamline the creation of CRUD apps, reducing development time. It supports seamless integration with various databases and APIs, ensuring data consistency. Whether managing user records, inventory, or customer data, Retool’s flexibility allows for custom workflows tailored to specific needs. Its visual approach makes it easier for both technical and non-technical users to build and maintain robust CRUD applications, enhancing productivity across organizations.

Client Portals

Retool enables the creation of secure and customizable client portals, allowing businesses to share data and collaborate with clients efficiently. These portals provide a centralized space for clients to access information, track progress, and interact with data in real-time. With Retool, you can design tailored portals that align with your brand and client needs, ensuring a seamless user experience. The platform’s integration with databases and APIs ensures accurate and up-to-date information, while its security features protect sensitive data. By streamlining communication and data sharing, Retool’s client portals enhance transparency and strengthen client relationships, making it an ideal solution for businesses seeking to deliver value to their clients.